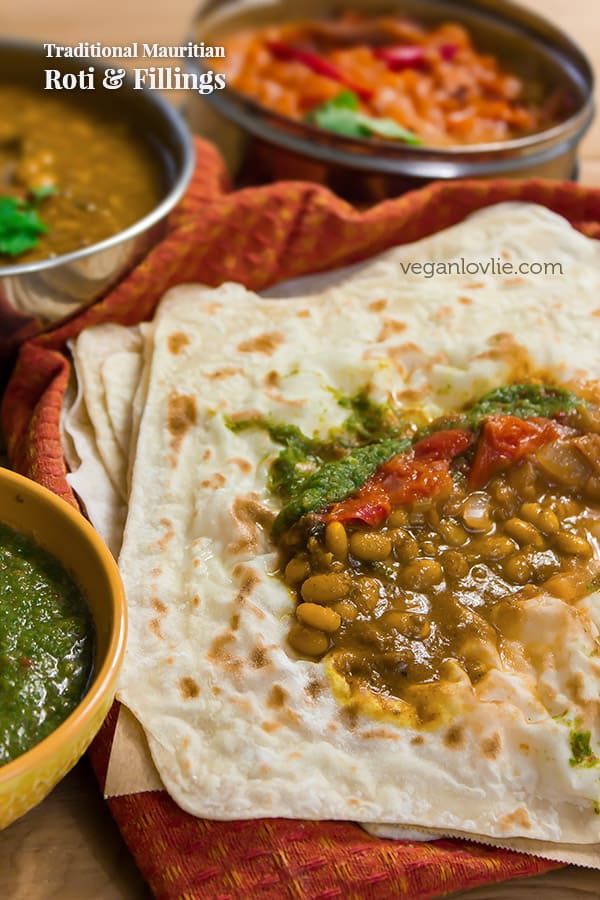
Traditional Mauritian Roti (Farata/Paratha) Recipe (oil-free version) with the fillings that are served with it. This is a popular street food in Mauritius.
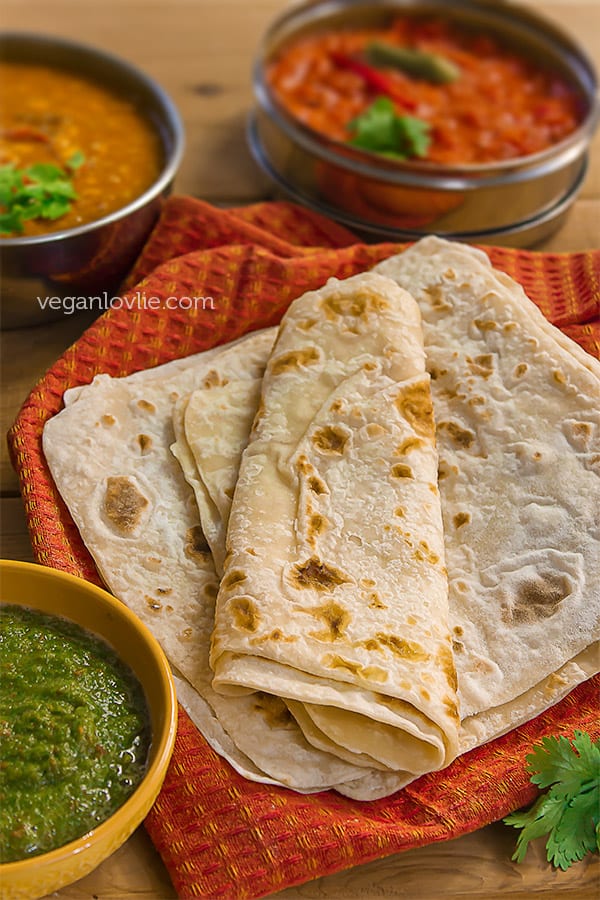
Embedded in the local food culture, rotis have been puffing on the Mauritian tawas for decades. Served with a few dollops of the typical white bean curry and rougaille sauce, roti or dal puris are the ultimate street comfort food that also happen to be accidentally vegan.
As humble as roti and curry may sound, the tingling spiciness of the white bean curry, the tartness of the rougaille sauce and the freshness of the chutneys along with mouthwatering hot and spicy pickles and chilies, all rolled up into a soft freshly made flatbread create the most satisfying treat for the palate. No wonder that through the ages, roti and curry remains one of the most popular food.
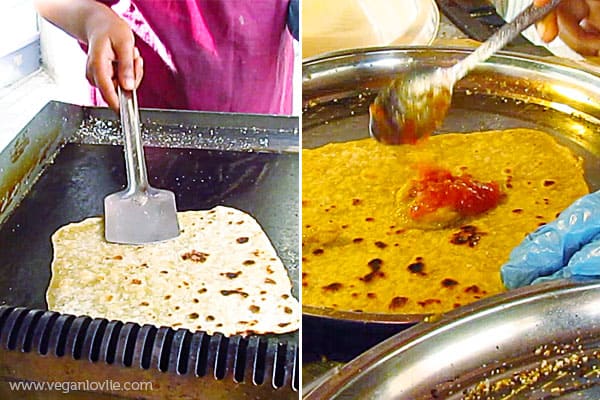
Photo/video clip credit: Parveena Dahari – Twitter: @oneshot_oneword | Instagram: @sprinklesofwonder
Quite inadvertently, roti and curry became my most revered sustenance during the one year that I spent in Mauritius after I became vegan. That said, they were one of my most relished street food even during my pre-vegan days. Finding vegan places in Mauritius is certainly quite a bit of a challenge. You would have thought that for the fact that there are a good number of people who regularly fast on vegetarian food, some decent vegetarian options at least, let alone vegan, would be more available but, not quite. Admittedly, roti and curry takeout would almost always save the day.
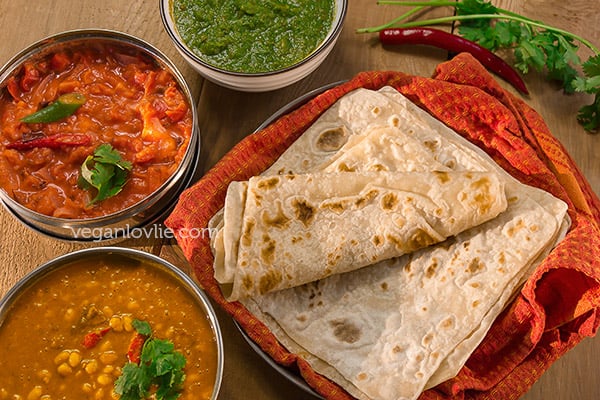
A recent request that came from a YouTube subscriber to feature the typical three to four toppings that is served with the Mauritian roti urged me into making these posts and videos series. While toppings may vary slightly depending on where the roti is being purchased, there are at least two that are the most common ones — the curry and the rougaille — and optionally, pickles along with preserved chilies. Some places also serve steamed taro greens or steamed/sauteed pumpkin; I will keep these preparations for a later post as we already have a lot on our plate for this series.
In parts 2 and 3, I will share the curry, the rougaille and the chutney. So, in the first part (which is this one) let’s start with making the roti itself. You can certainly make the roti, the curry, the sauce and the chutney, all on the same day. While it does seem like a lot, it is very doable in about an hour and a half, I would say, if you are organised and can moderately multi-task.
The commercial roti (farata or paratha type) calls for oil in the dough and, more often than not, are liberally smeared with oil when being made into folded parcels and then again when cooked. This gives the roti a much softer texture and more flavour. However, I am personally not a great fan of the oil-drenched flatbreads that feel like a brick on the stomach despite being delicious. When making them at home, I get the chance to make them more on the healthier side. As such, in this recipe, they are completely oil-free while still remaining delicately soft and tasty. However, you may, as per your liking, brush the rolled out or flattened dough with a little oil before folding the edges in to form the parcel of folded layered dough. Undeniably, using a little oil at this stage will create a better multi-layered farata.
To help this oil-free roti retain its velvety soft texture, the water that is added to the flour has to be boiling hot, just out of the kettle. The amount of flour and hot water needed may vary slightly depending on the type of flour you are using and the temperature of the water. If the temperature of the water is slightly lower than boiling hot, you will need more flour. What we are looking to achieve is a soft, supple and non-sticky dough.
Watch the recipe video.
Roti (Farata/Paratha) Recipe – Oil-Free
Ingredients (yield 6 rotis)
1 1/2 cup [240g] all-purpose flour (you may also use atta flour but you will need to adjust the water)
200 ml boiling hot water (adjust with 1-2 tablespoons depending on flour type)
More flour for dusting
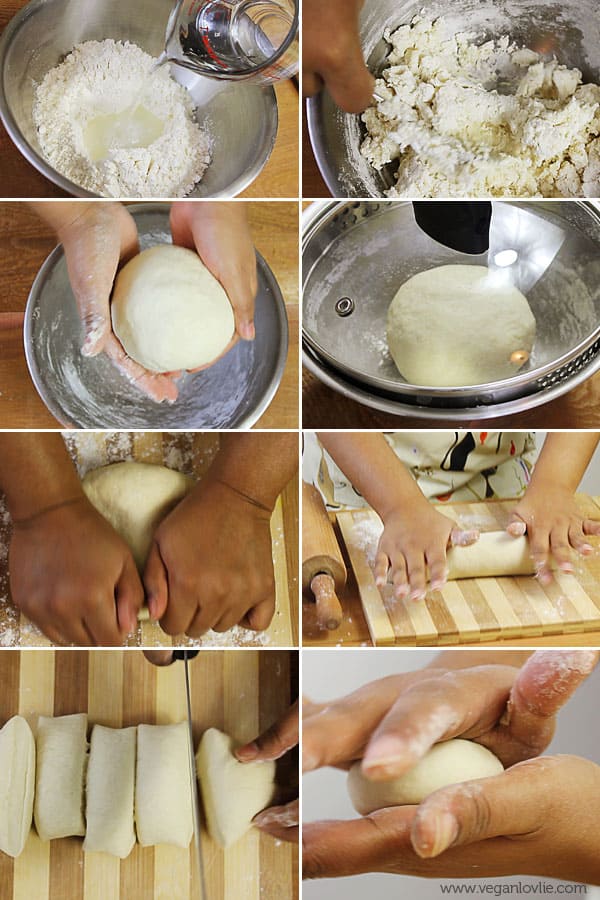
In a large mixing bowl, add the flour. Make a well in the centre and carefully pour in the hot water. With the help of a spoon, stir the mixture to combine the flour and water. Keep mixing as much as possible to start forming a dough.
Once the mixture is a little cooler and comfortable to handle by hand, start to knead it into a supple dough. At this stage, you can either add a little more flour if the dough is sticky or a little water if it is too dry.
Once a soft and non-sticky dough is obtained, smooth it into a ball and place it back into the mixing bowl.
Cover with a lid or tea towel and let it rest for about 15 minutes.
Meanwhile you can start to prepare some of the ingredients for the upcoming curry and rougaille recipes.
After 15 minutes, knead the dough for a couple of minutes. Then roll it out into a log and cut into 6 equal pieces. Roll each piece in the palm of your hands to form a nice smooth ball then flatten it. Lightly press all around the edge then dip in a bowl of flour to completely coat the dough with the flour. Set the floured dough aside and do the same for the rest of the dough pieces.
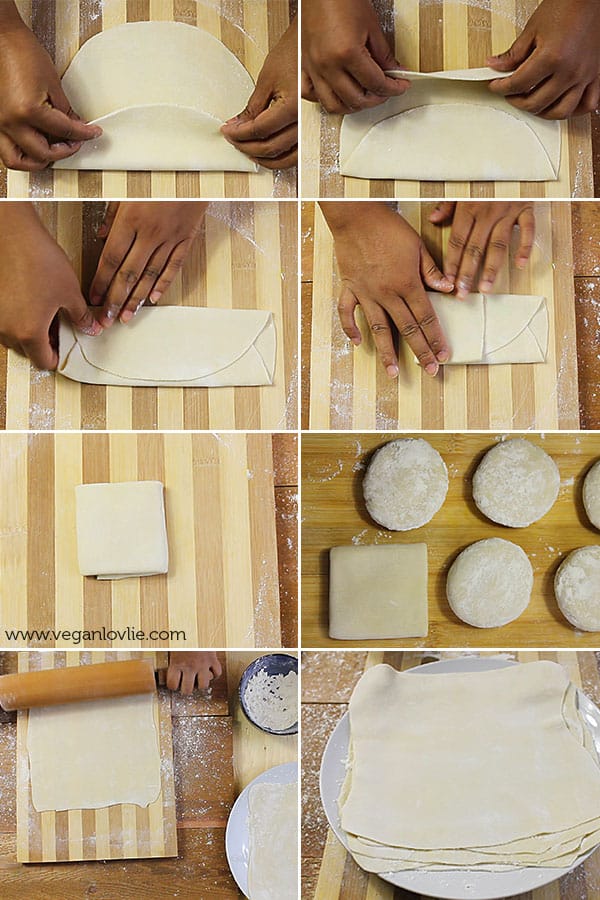
On a floured board, place one piece of dough and begin to roll out. Try to keep a more or less circle shape and roll out to about 2 mm thick.
Then at this stage, you can brush the surface of the flatten dough with a thin coat of oil, if you want, before folding it. Otherwise, fold 1/3 of the circle of dough toward the centre and fold the opposite edge over to form a long rectangle. Now fold, the two shorter ends toward the centre to form a square.
Repeat for the rest of the dough. Keep all the dough pieces and folded ones covered while you are working on the rest so that they don’t dry out.
Now take the folded dough parcel and place on a floured board. Begin to roll out to about 2 – 3 mm thick. The shape will more or less remain square which is one of the characteristic of the farata.
Place the rolled out farata onto a floured plate and continue with the rest flouring them between each layer so that they do not stick to one another. If you are making a bigger batch of roti, I do not recommend that you stack more than 10 as with time, the gluten will relax further and the rotis at the bottom will start to stick to one another.
Before starting to cook the faratas, turn the whole stack over so that you may start with the first rolled out roti.
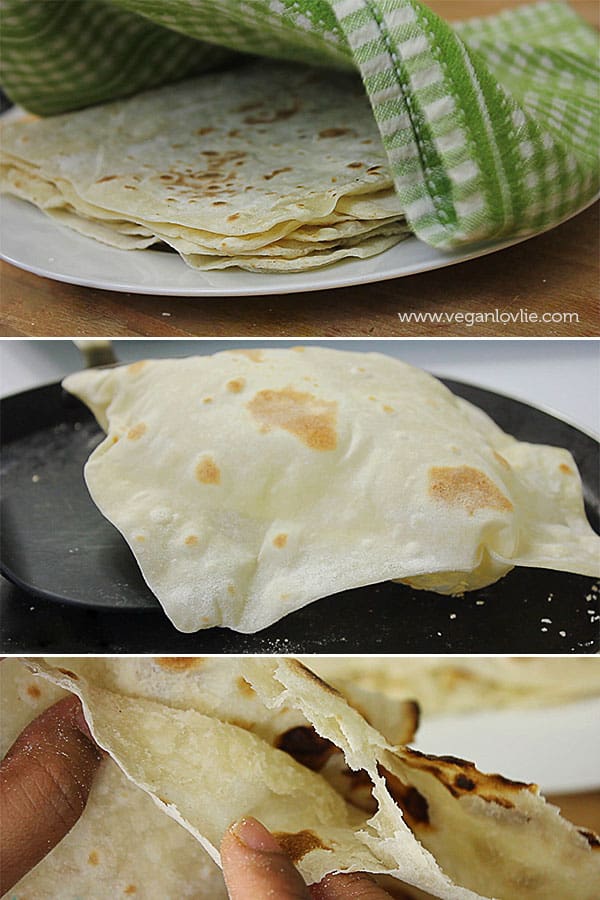
Make sure the tawa or crepe pan is hot and the heat kept on medium-high. You may need to adjust the heat later if the pan gets too hot. Allow the roti to cook for about 30 seconds on one side and then flip over and cook for another 30 seconds until it starts to bubble. Then flip it over again and it will start to puff up. Gently press on the side of the puff to push and distribute the air inside the roti for a more even puffing.
Then remove the roti from the pan and place on a plate. Keep the roti covered with a clean tea towel to keep it soft.
Cook the rest of the rotis and stack them on top of one another. Occasionally flip the stack over. This will keep the freshly cooked ones soft with the steam.
These rotis are best enjoyed fresh and on the same day.
Now all we need is some curry to go with it. Check out parts 2 and 3 where I share the fillings which are the White Bean Curry, the Rougaille Sauce and the Coriander Chutney recipes.
Also in this series:
Mauritian Roti Recipe – Farata or Paratha (oil-free version)
Ingredients
- 240 g all-purpose flour, [1 1/2 cup] or chapati flour, you may also use atta flour but you will need to adjust the water
- 200 ml boiling hot water, adjust with 1-2 tablespoons depending on flour type
- More flour for dusting
Instructions
- In a large mixing bowl, add the flour. Make a well in the centre and carefully pour in the hot water. With the help of a spoon, stir the mixture to combine the flour and water. Keep mixing as much as possible to start forming a dough.
- Once the mixture is a little cooler and comfortable to handle by hand, start to knead it into a supple dough. At this stage, you can either add a little more flour if the dough is sticky or a little water if it is too dry.
- Once a soft and non-sticky dough is obtained, smooth it into a ball and place it back into the mixing bowl.
- Cover with a lid or tea towel and let it rest for about 15 minutes.
- Meanwhile you can start to prepare some of the ingredients for the upcoming curry and rougaille recipes.
- After 15 minutes, knead the dough for a couple of minutes. Then roll it out into a log and cut into 6 equal pieces. Roll each piece in the palm of your hands to form a nice smooth ball then flatten it. Lightly press all around the edge then dip in a bowl of flour to completely coat the dough with the flour. Set the floured dough aside and do the same for the rest of the dough pieces.
- On a floured board, place one piece of dough and begin to roll out. Try to keep a more or less circle shape and roll out to about 2 mm thick.
- Then at this stage, you can brush the surface of the flatten dough with a thin coat of oil, if you want, before folding it. Otherwise, fold 1/3 of the circle of dough toward the centre and fold the opposite edge over to form a long rectangle. Now fold, the two shorter ends toward the centre to form a square.
- Repeat for the rest of the dough. Keep all the dough pieces and folded ones covered while you are working on the rest so that they don’t dry out.
- Now take the folded dough parcel and place on a floured board. Begin to roll out to about 2 – 3 mm thick. The shape will more or less remain square which is one of the characteristic of the farata.
- Place the rolled out farata onto a floured plate and continue with the rest flouring them between each layer so that they do not stick to one another. If you are making a bigger batch of roti, I do not recommend that you stack more than 10 as with time, the gluten will relax further and the rotis at the bottom will start to stick to one another.
- Before starting to cook the faratas, turn the whole stack over so that you may start with the first rolled out roti.
- Make sure the tawa or crepe pan is hot and the heat kept on medium-high. You may need to adjust the heat later if the pan gets too hot. Allow the roti to cook for about 30 seconds on one side and then flip over and cook for another 30 seconds until it starts to bubble. Then flip it over again and it will start to puff up. Gently press on the side of the puff to push and distribute the air inside the roti for a more even puffing.
- Then remove the roti from the pan and place on a plate. Keep the roti covered with a clean tea towel to keep it soft.
- Cook the rest of the rotis and stack them on top of one another. Occasionally flip the stack over. This will keep the freshly cooked ones soft with the steam.

Hi ,
Good recipe but if I replace all-purpose flour with brown flour (whole flour ) , Do I need to change the amount of water or I just need to use the same amount that in this recipe ?
Thanks
Hi Hazem, thank you for your comment. Wholewheat brown flour will need a little more water, 1-2 more tablespoons. It depends on the flour type. You should try to get a soft non-sticky dough. If dough feels sticky, just add a little more flour and it should work out.
Hi Teenuja, I love your recipes and have tried out quite a few already since I discovered the blog some weeks ago. I was wondering if you could make the roti with white spelt flour. And if so, is it necessary to adjust the amount of water?
Thanks
Hi Anja, sorry for my late response. I was meant to do a little test to get the exact measurement before replying to you but I got taken up by a few projects lately. So, I tested it out today and for 240 g of white spelt flour, I used 170 ml boiling hot water. So it’s like reducing the initial amount of water by 2 tablespoons. I hope this helps. 🙂
Hi Teenuja, thanks a lot for the exact measures of spelt flour and water! I will definitely try it. 🙂
I made these with the tikka masala curry and these were relatively simple. They were delicious but bubbled less. I brushed the insides with a tiny bit of oil and they were very good.
Thank you so much for this recipe! I have been for a month in Mauritius and I are almost everyday roti! I am so glad that I found your blog. I tried it today and it tastes awesome! Like the ones I had in Mauritius <3
I tend to do the same when I’m in Mauritius! lol! Great to hear you enjoyed the rotis. 🙂
Thank you for such a nice video, my rotis are resting before rolling them out later 🙂
I’d come across Mauritian cuisine at a local cafe, and loved it, so i wanted to cook my own, having come across your series was wonderful! I love the way you explain how they can be used together and what they go with… simply a delight to watch learn and understand. Thank you so much
Hi…wow I tried this roti today and I. USF say the best ever..and I was successful. Don’t many roti recipes but could quite get thin Chewy like yours! Will land in my recipe collections. Why did I stumble upon your recipes just now. Anyhow…..looking forward to trying your other recipes. Thank you.
Sorry for topographical errors..
USF….I meant must say…
Don’t many…I meant I have done many recipes….